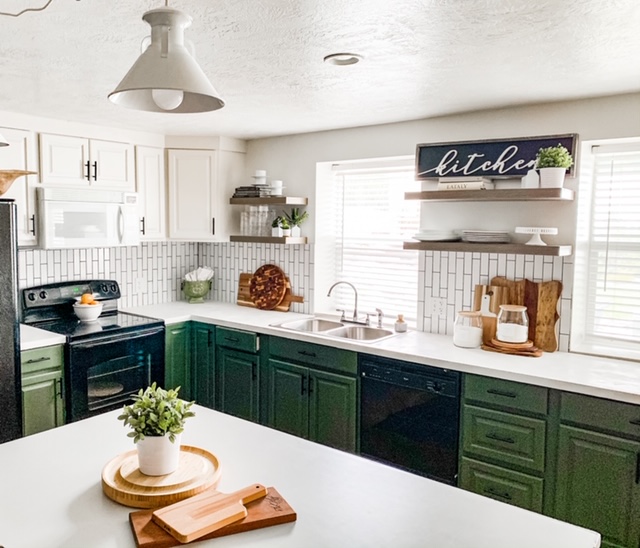
Budget Kitchen makeover under $500.
April 28, 2020
 Me and my hubby bought our current house because it had a mother in law apartment in the basement. As you know I have a Down Syndrome boy who will be living with us for the rest of our lives, so this was a must when we were looking for a house 8 years ago. After those 8 years we were in desperate need to upgrade both kitchens. We started with the basement kitchen for our budget kitchen makeover, practice run and it turned out spectacular. We also only spent $500!!
- First step planning
The first step to take when planning a tight budget kitchen makeover, is getting the big picture in your head. Know where the money needs to be spent. In our case we needed a backsplash, new counter tops, painted cabinets, and floating shelves. We decided to spend the most on our tile. We desperately wanted to change the flooring but my designer said it will look amazing with the dark cabinets. We saved $1,500 by not doing the floor.

- Second step what order
The Second step of getting your budget kitchen makeover on a budget, is figuring out what makes sense to do first. I painted all my cabinets first and then taped them off for the rest of the project. But painting the cupboards last might have been a better option because my counter tops were supper messy. Live and learn right?
- Make a timeline
After the planning get to it, I took off two weeks of work so that I could do it all myself, it’s always going to take longer than you think right? I love painting cupboards, this was my 6th time painting kitchen cupboards.  I must say I do love to spray the doors it saves so much time! This time however I rolled them by hand because it was the middle of winter and we couldn’t go outside to spray. I loved the dark green color we used, its Rookwood Dark Green from SW.

- Budget your accessories to save money
Another trick we used to save money was to spray paint our hardwear. We took our silver drawer pulls and sprayed them glossy black. I wish we could have gone matt black but glossy was free so we just settled for a bit of shine. If you want matt black I suggest these from Amazon they are so inexpensive. Square Matt black and school house knockoffs in black

- Borrow expensive power tools.
We borrowed a wet saw which saved us time. It also cut our tile so nicely, and was so easy I could do it. I have a blog post Here (How to tile your own backsplash) It was so fun that after I did the kitchen I used the extra supplies to tile a small backsplash in the downstairs bathroom.

- Sometimes your second choice is the coolest
The counter top was going to be $1,000 for a cheap laminate top, $400 for Ikea butcher block and $80 for white concrete. Guess what one we choose? The concrete is soooooo cool I’m loving how it looks, however I can’t tell you about the durability yet seeing we have only had it for a few weeks. Here is the link to the (DIY your own concrete countertops blog post) (countertop supply list)
I really wanted floating shelves but the ones I wanted were $100 apiece and I needed 4 so that was a big no way. I found these faux wood floating shelves at Home Depot for $25 a piece so 4 for the price of one was a steal! I did have to sacrifice my style a bit and I sacrificed one the quality (these are not going to last forever) but they looked great and you can alway upgrade later.
 I still need a few things like window sills and window coverings but for now this mini makeover just makes me so happy. I loved that I did all the work myself and saved myself thousands of dollars. I hope you get brave to do something amazing in the home you are living in. Here Is the break down
Tiel 260.00 paint 30.00 shelves 108.00 concert countertops 80.00 drawer pulls FREE extras like sponges and drop cloths 25.00 total $503 TOTAL TRANSFORMATION!

[…] Kitchen makeover under $500. […]