Studio 5
October 29, 2012
Studio 5 is so fun! They have such a great energy on that show. Everybody from Brooke and Darin to all the fabulous behind the scenes people, like Steph, and funny camera guys. I could happy going to work there every day! The assignment for me this segment was to come up with fun and easy ways to dress the back of your chairs for fall and Thanksgiving.

Once I started I couldn’t stop. I had so much fun playing in my pile of
glitter, glue, and ribbons. Do you want a run down of the projects??
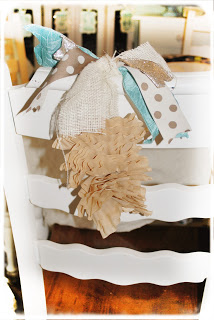
its going to be long so hang on. The one above is what started it all. I wanted to do a segment on different color schemes for your fall and Thanksgiving deco, but they loved my chair bow. It was made with a strip of burlap, I stapled coffee filters that were folded in fourth to the burlap, wrapped it around the chair and tied a bow on top.

Its hard to see this wreath but that is what it is, I wrapped it in fabric and started gluing everything i could find laying around the house on it. a glitter pumpkin, baby pine cones, a printable and little grateful banner and them filled in the spaces with fabric that i ripped into strips and tied on. Easy!

Here is the link to the free printable 🙂
https://www.dropbox.com/s/ugcr5vw512but58/so%20greatful.jpg

This little banner is the one that i demoed on Studio 5. Take a ribbon and glue on coffee filters, tie ribbons to the end and print a phrase for the holiday you want to highlight. I had Halloween ones with black and gray ribbons, with the word Spooky and a little bat on a wire. Change the ribbons to red and print a Merry Christmas and ta-tah! Christmas Deco.

This was the easiest by far. I bought a pick at Hobby Lobby tied it to a piece of burlap ribbon also from HL and added an acorn, Hello this is one that you could do for whole table because it took like two minutes and it looks like a million bucks.

This little cutie is a metal tray from the dollar store, I just used a printable I loved glued it on adding paper fringe a few pine cones and tied it to the chair with a little printable from the Graphicsfairy.blogspot.com

Paper cone I know its been done and done and done but it always looks so cute! a few feathers and few baby pine cones dangling from ribbon and again graphics printed and wired in or glued on. Stuff with tissue paper and a treat or two.

Ok cute kids silhouettes and so easy to make I thing I’ll do a tutorial later on this but there are a few on the Internet that show you how with out using photo shop. Pop it into a dollar store frame and tie to chair. The fun part is having the kids find their own photo.

Again so easy to do this one and its so sparkly it could almost be saved and put on your Christmas tree. Its just a pine cone box from Martha Stewart. I covered it in glue and sprinkled it with glitter. then glued a little gold rickrack around the seam and done. Inside is a little treat for the kids or frankly any adult who whats a sugar rush.

Ok so I saved my favorite for last. Its so hard to see but the base for this banner is chicken wire cute to the size you want and the edges wrapped in ribbon then I glued my printable on trimmed out in leopard tissue paper tied ribbons in the corners and stuck an acorn pick and feather in the left side. I love the way this looks and its so funky and fun and lets face it our family is defiantly funky and fun we are not very formal, just give us yummy food, lots of family and we will always have fun making memories!

Here is the link to the free printable I created for the banner.
https://www.dropbox.com/s/1skykgtzfqzs7x8/happy%20thanksgive.jpg

