How to make Giant Party Decor, using Honeycomb Balls.

How to Make a Honeycomb Ball Party Swag!
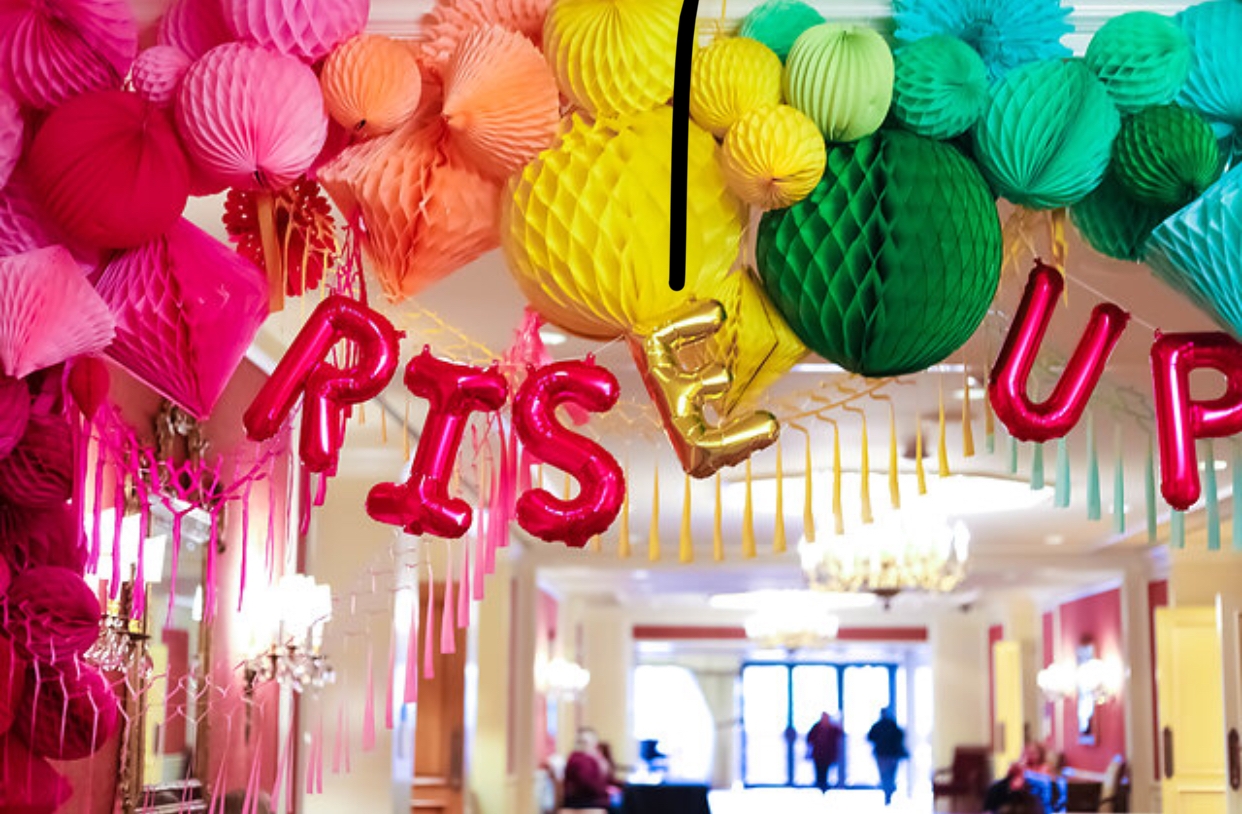
Talk about a huge impact and drama with little cost!! This giant swag made from honeycomb ball puffs was a cinch. I’ve been doing large installations for the crafting conference Snap every year for the past few years. We have done ombre helium balloons, paper chevron panels, balloon arches, and honeycomb swag. This has been my favorite decor, not because it was the easiest to make! (although it was the easiest one to create and install LOl) It is the happiest swag I have ever seen. The colors, the shapes, and the textures are so magical. Ok, enough talk, let’s get to how to make this giant party decor.


Where to get the honeycomb ball decor you ask? I got mine from a few places. My favorite place is always Amazon, where I buy these cute honeycomb balls. They had the best selection, the best color combinations, and the most sizes. However, they were the most money, but worth it if you need specific colors. I also got some from Walmart. I also found some on Amazon and a few at Zurchers . Disclaimer Zurchers had yucky colors online, but might have cuter colors in store, didn’t check, they were also $5 each. Once you get all your honeycomb balls, you must put them together.

Honeycomb ball swag Step 1: add ribbon

The first thing I did was attach my ribbon because it was used for a large conference and I wanted it to look professional. Second, I wasn’t sure how much of the base would show through, and I wanted it to be as camouflaged as possible. Third, I needed a longer ribbon to tie some of the bigger honeycomb balls onto the balloon tape. I began by cutting off the scrawny twine that comes with the honeycomb ball decorations, and then I hot glued a 16-inch length of ribbon folded in half that matches my puff. It sounds complex, but I watched one and a half Psych episodes and was done with over 100 honeycomb balls! The extra ribbon length also helped us tie a bow in the balloon tape instead of a knot to quickly dismantle the puffs after the conference. If we had to cut all the little pieces of twine after we were done, it would have been a nightmare, and we wanted to save the puff for other parties.
Honeycomb ball swag, Step 2: paper-clip them open

I did not paper clip mine open for the conference, they come with sticky tape, so I used it. I needed to ensure my swag stayed perfect for three days of lots of people going by and kids trying to grab them down!! and no, they failed, thank goodness. If I were using the honeycomb balls for a banister swag or around my door, I would use a paperclip to keep them open, because then they are more reusable and won’t rip as easily when you take them apart.
Honeycomb ball swag step 3 tie to balloon tape


Do you know what balloon tape is? No? ok, let me tell you what balloon tape is, it is 50 yards of a clear tape that has holes punched in it every inch, and is used to make balloon arches. I’ve used this for many balloon installations and it’s a lifesaver. Having something to tie the balloon to won’t slip, slide, and move around like it would if we just tied it to a wire. Speaking of wire, you must thread a heavy gauge wire through every 4th hole in the balloon tape. You need the wire to create a bendable swag, and also it will give more stability to the swag, the honeycomb balls are a bit heavier than balloons.
I started by tying the big Honeycomb balls into place and spacing them evenly apart, then I just started filling in with the other honeycomb balls. Use the big ones first, no matter what shape, then fill in with the medium-sized ones. Wait until you install your swag to add the smaller ones in. You need the small sizes, 4- 6 inches, to fill in the holes.
Honeycomb ball swag step 4: hanging the swag

Sound hard to hang this swag? Nope, not really, we hung ours from the ceiling at the hotel with large paper clips in the air conditioner track. Ha Ha, but at home, it is a bit easier. I suggest using large 3 m hooks for at least 10lbs. Use 5-8 hooks on your walls and then hang with a piece of ribbon that you tie at that exact spot of the hook, you don’t want the hooks to be pulled from a weird angle, that might pop them off the wall. If you are using your stair banister, then do the same thing, swag it up, and tie into place with a piece of ribbon. When I put my swag on my banister, I flopped one side over and tied it to the top. If you want it around a door, use the same 3m hooks attached to the wall alongside the moldings.
Honeycomb ball swag step 5: add the festooning

Once you have this giant beast up, you are ready to make it look perfect! This is the time to see where your hole is and fill it up. I loved the more petite honeycomb balls, but you will get more wow factor if you use paper fans. You can find the darling tissue paper fans from where you see the balls. These fans look so lacy and give you another texture to play with. If you use a wall, tuck them in where you want them and tape them into place. If you’re hanging in a doorway, tie them to the back of the arch so they can peek out from the front. I also added tissue paper fringe. It’s so darling and looks like macrame, it adds a cute boho look to the whole thing!

You guys, that’s it. This project is significant in drama and minor in price. You could spend hundreds of dollars on a wedding photo booth or fancy flowers. This is just the right pop of fun for your party for maybe a hundred dollars or less. The best part is you can custom-create the colors and reuse these darling little honeycomb balls at your next party! If you want more party ideas for your honeycomb puffs, return when I post the cute freestanding balloon stands in a few days. Until then I hope you have a happy day!
Some links in this post may be affiliate links. These links help to keep this blog up and running. Thank you so much for supporting small crafters.

- Totally 20pcs 6inch colorful honeycomb balls,mini flower balls, small honeycomb balls, cute paper balls for decorations
- They are easy to put together which flat packed ready to unfold and hang string attached.